|
Back to Blog
 Whether you are a high school competitor looking to improve your running speed or you are a Division I elite athlete that is wanting to stand out to professional scouts, you need the proper drills and techniques to help you elevate your level of competition. While there are many speed and quickness drills to help you run faster, many of these drills do not produce measurable results. This is just one of the reasons why we have designed one of the most effective speed training programs so that you can run faster, jump higher, and outcompete anyone that stands in your way.
0 Comments
Back to Blog
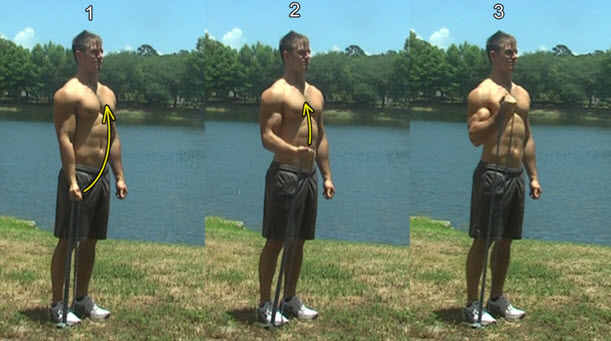
 ISOMETRIC TRAINING WITH THE RESISTANCE BAND
Back to Blog
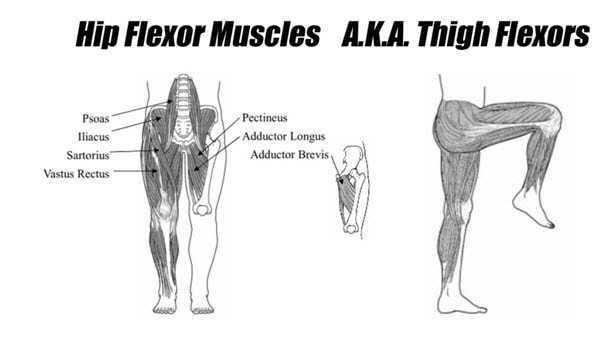 There are 7 hip flexor muscles on each side of the body and they are prominent in nearly all sports activities, such as running, kicking, jumping and play a role in swinging a bat, golf club or tennis racket. 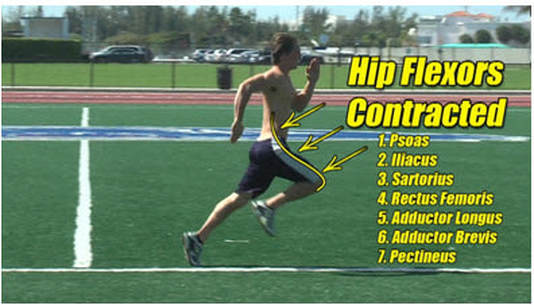 The hip, or, thigh flexor muscles in action.
Back to Blog
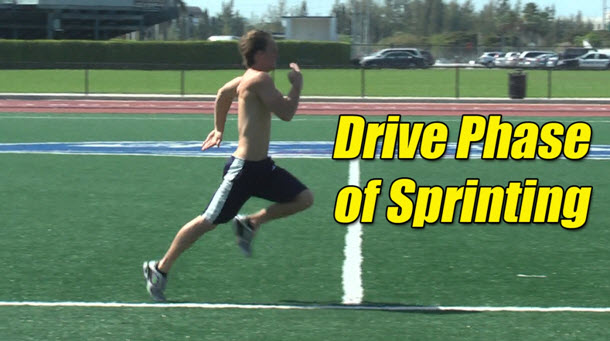 If you want to improve your running speed it will be helpful to know the 3 phases of the running process and the muscles used in each phase. By understanding this you can train all the muscles used when running for faster running speed. 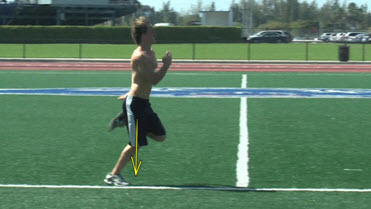 Figure 1. Drive phase starts when the knee is perpendicular to the ground. 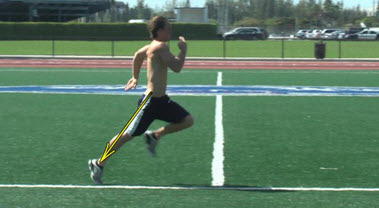 Both the starting and ending positions of the drive phase can be seen side by side in the image below: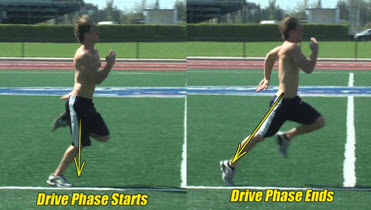 The drive phase is powered by three basic muscle groups; the hip extensors, which involve your glutes and hamstrings, your knee extensors, or quadriceps muscle and your ankle plantarflexors, or calf muscles. See image 4 below.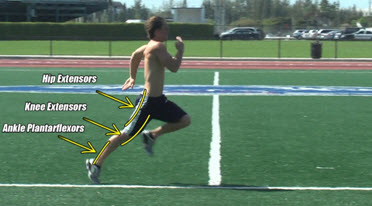 Image 4. Hip Extensors, Knee Extensors and Ankle Plantarflexors power the drive phase of running.
Back to Blog
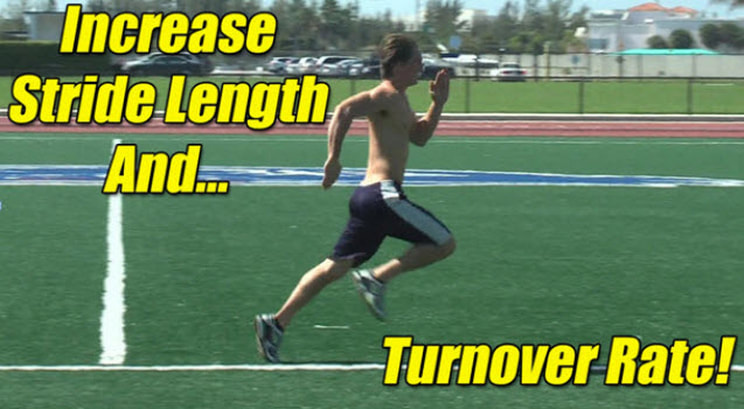 One of the best ways to increase your running stride length and turnover rate is to develop strong hip flexor muscles. These are powerful and long muscles located in the front side of each of your hips.
They get called into action every time one of your legs gets fully extended behind you. Above we can see the athlete’s left leg is now fully extended behind him. This stretches the hip flexor muscles in front of his left hip and now they are ready for action. At this point, it is the job of the hip flexor muscles to first pull the weight of your entire leg underneath your body. This action of the hip flexors continues until the thigh is fully flexed in front of your body. if you ever want to be an all-star athlete and be able to separate yourself from a defender to make a play, or run a faster 40, or perhaps become a better defender in football and never let your man get open like a shut-down cornerback, or even something like stealing second base, beating a throw to first or chasing down a fly ball in baseball, you will absolutely need to start training to improve this area immediately. As you can imagine, this is a very powerful motion that tends to get overlooked in one’s training and is one of the keys to help athletes improve not only their stride length, but, their turnover rate as well. Get more details about stride length for running speed at https://aqspeed.com/articles/2-of-3-the-swing-phase-or-stride-of-the-running-motion/ If you have any questions about how to improve your running stride and turnover rate, please contact us at: athleticquickness.com. For purchase information go to: AQSpeed.com [This post originally appeared on https://aqspeedtraining.wordpress.com]
Back to Blog
 When it comes to athletic speed training workouts with resistance bands in any sports training program there are basically two ways that people like to use them.
Back to Blog
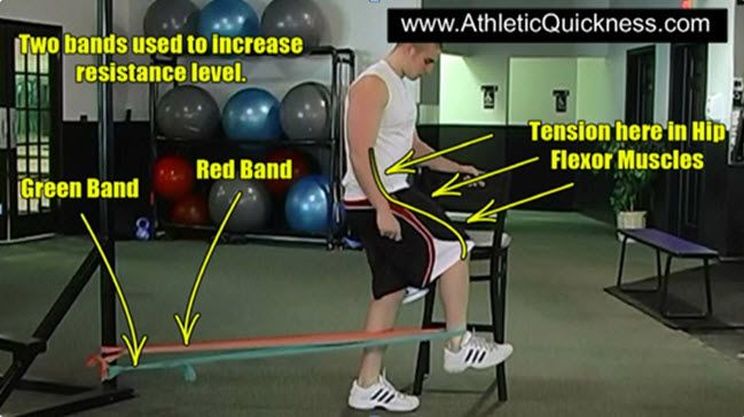 We get lots of questions on how to use resistance bands for speed, especially when it comes to helping people run faster in any sport and as part of their speed training program for soccer, football, track and most any other sport where speed matters. Questions like how, or, where to attach them so they won’t easily break when while using them. We recommend attaching them to an immovable object (relative to your own strength) such as a steel pole as well as one that doesn’t have any sharp edges that may tear your band. Another question we often get is, “how much effort you should use?” We recommend using between 70-80% of your maximum strength for each isometric exercise and to get an idea of how much effort this is, you should feel like you need to take a break after holding a steady (static) position with the band for about 10 seconds. If you can hold it longer than, say, 15 seconds you probably are using less than 70% effort. Also, if you have trouble holding the band in any position for less than 10 seconds, you are probably using more than 80% effort. Even questions regarding proper positioning, while it may seem easy, can be a little more challenging for some depending on where they plan to use them. All it takes is to first get into the final exercise position, one time, and see how the resistance feels. If it feels too hard, as in too much resistance, then move back closer to where the band is attached and try again. This will prevent the band from stretching too far and lower the resistance. If it feels too easy the first time you try it, then step a few more inches away from where it’s tied. This will cause your band to stretch further thereby increasing the resistance it can supply. Proper positioning of each exercise will become easier the more get you get familiar with them. And other questions we get routinely asked about are how to increase the resistance as you get stronger as well as how to maintain your safety with good balance during an exercise. Use two bands to increase the resistance level and stabilizing the body by holding on to a chair with his left hand, for balance. Go here for more about Resistance Band Training If you have any other questions regarding how to use resistance bands please contact us at athleticquickness.com. To purchase a speed training program go to https://www.aqspeed.com [This post originally appeared at https://aqspeedtraining.wordpress.com/2018/05/31/how-to-use-resistance-bands/] |
